In an era where technology seamlessly integrates into our daily lives, the concept of smart plant monitoring has emerged as a revolutionary approach to gardening and agriculture. This innovative system leverages sensors, microcontrollers, and data analytics to provide real-time insights into the health and needs of plants. By utilizing smart plant monitoring, gardeners and farmers can optimize their cultivation practices, ensuring that plants receive the right amount of water, light, and nutrients.
This not only enhances plant growth but also conserves resources, making it a sustainable choice for both hobbyists and professionals. The rise of smart plant monitoring systems is largely attributed to the increasing interest in precision agriculture and urban gardening. As urban spaces become more populated, the demand for efficient food production methods has surged.
Smart plant monitoring systems can be tailored to various environments, from small indoor gardens to expansive agricultural fields. By employing these technologies, users can monitor soil moisture levels, temperature, humidity, and even light exposure, allowing for data-driven decisions that lead to healthier plants and higher yields. The integration of IoT (Internet of Things) technology further enhances these systems, enabling remote monitoring and control through smartphones or computers.
Key Takeaways
- Smart plant monitoring allows for real-time tracking and analysis of plant health and environmental conditions.
- The Arduino board should be chosen based on the number of sensors and the level of complexity required for the smart plant monitor.
- Essential sensors for a smart plant monitor include soil moisture, temperature, humidity, and light sensors.
- Proper wiring and connection of sensors to the Arduino board is crucial for accurate data collection.
- Coding and programming the smart plant monitor involves setting thresholds for sensor readings and defining actions based on the data collected.
Choosing the Right Arduino Board for Your Smart Plant Monitor
When embarking on the journey of creating a smart plant monitor, selecting the appropriate Arduino board is a critical first step. Arduino boards come in various models, each with unique features that cater to different project requirements. For instance, the Arduino Uno is a popular choice for beginners due to its simplicity and versatility.
It offers a sufficient number of input/output pins for basic sensor connections and is well-supported by a vast community, making troubleshooting easier for novices. On the other hand, if your project demands more advanced capabilities, such as wireless communication or additional processing power, you might consider the Arduino Mega or the Arduino Nano 33 IoT. The Mega boasts a larger number of pins and memory, making it suitable for complex projects with multiple sensors.
The Nano 33 IoT incorporates Wi-Fi and Bluetooth connectivity, allowing for remote monitoring and control via mobile applications. This feature is particularly beneficial for users who wish to access their plant data from anywhere, enhancing the overall functionality of the smart plant monitor.
Selecting the Essential Sensors for Your Smart Plant Monitor

The effectiveness of a smart plant monitoring system largely hinges on the selection of appropriate sensors. Various sensors are available that can measure different environmental parameters crucial for plant health. Soil moisture sensors are among the most essential components; they provide real-time data on soil hydration levels, allowing users to determine when to water their plants.
Capacitive soil moisture sensors are particularly popular due to their durability and accuracy compared to resistive sensors. In addition to soil moisture, temperature and humidity sensors play a vital role in monitoring the microclimate around plants. The DHT11 or DHT22 sensors are commonly used for this purpose, as they can measure both temperature and relative humidity with reasonable accuracy.
These readings are crucial for understanding how environmental conditions affect plant growth and can help in making informed decisions regarding ventilation and watering schedules. Light sensors, such as photoresistors or the TSL2561 light sensor, can also be integrated into the system to monitor light intensity, ensuring that plants receive adequate sunlight or artificial light.
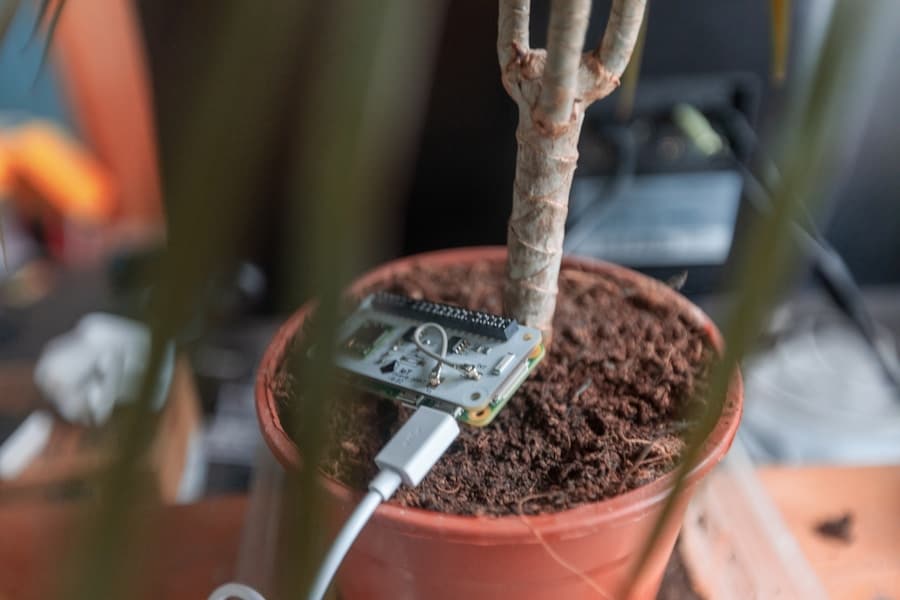
Connecting and Wiring the Sensors to the Arduino Board
Once you have selected your Arduino board and sensors, the next step involves connecting and wiring them together. Proper wiring is essential for ensuring that your smart plant monitor functions correctly and reliably. Each sensor typically comes with specific pin configurations that must be adhered to when connecting them to the Arduino board.
For instance, a soil moisture sensor usually has three pins: VCC (power), GND (ground), and an analog output pin that sends moisture data to the Arduino. To facilitate clear connections, it is advisable to use a breadboard during the initial setup phase. This allows for easy adjustments without soldering components together permanently.
When wiring your sensors, it’s important to double-check connections against the sensor datasheets to avoid any potential damage or malfunction. Additionally, using color-coded jumper wires can help keep track of connections and ensure that everything is organized. Once all sensors are connected properly, you can proceed to test each sensor individually using simple code snippets to verify their functionality before integrating them into your main program.
Coding and Programming Your Smart Plant Monitor
Programming your smart plant monitor is where creativity meets technical skill.
The first step in coding is to include the necessary libraries for each sensor you are using; these libraries contain pre-written functions that simplify interaction with the hardware.
For example, if you are using a DHT sensor for temperature and humidity readings, you would include its library at the beginning of your code. After setting up your variables and initializing your sensors in the `setup()` function, you can move on to the `loop()` function where continuous monitoring occurs. In this section, you will read data from each sensor at regular intervals—perhaps every few seconds—and store this information in variables for further processing or display.
Moreover, incorporating conditional statements can enhance your system’s functionality. For instance, you could program your monitor to send alerts via an LED indicator or even trigger a water pump when soil moisture levels drop below a certain threshold. This level of automation not only simplifies plant care but also ensures that plants receive timely attention based on real-time data.
Assembling and Installing Your Smart Plant Monitor

With your code written and tested successfully, it’s time to assemble your smart plant monitor into a cohesive unit. This stage involves securing all components in a manner that protects them from environmental factors while ensuring accessibility for maintenance. A suitable enclosure can be crafted from materials like plastic or wood; it should have openings for sensors while keeping electronic components safe from moisture and dirt.
When installing your smart plant monitor in its intended location—be it indoors or outdoors—consider factors such as sunlight exposure and proximity to power sources if needed. For outdoor installations, ensure that your enclosure is weatherproofed to withstand rain or extreme temperatures. Additionally, if you are using wireless communication features, position your monitor within range of your Wi-Fi network or ensure that it has a clear line of sight for Bluetooth connectivity.
Once installed, it’s beneficial to conduct a final test run of your system in its operational environment. This allows you to verify that all sensors are functioning correctly under real-world conditions and that data is being transmitted accurately to your monitoring interface.
Monitoring and Analyzing Data from Your Smart Plant Monitor
The true power of a smart plant monitor lies in its ability to collect and analyze data over time. Once your system is operational, it will continuously gather information about soil moisture levels, temperature, humidity, and light intensity. This data can be displayed on an LCD screen connected to your Arduino or sent to a cloud service for remote access via a smartphone app or web interface.
Analyzing this data provides valuable insights into plant health and environmental conditions. For instance, by tracking soil moisture levels over time, you can identify patterns related to watering needs based on seasonal changes or specific plant growth stages. Similarly, temperature and humidity trends can inform adjustments in care routines—such as increasing ventilation during hot spells or providing additional water during dry periods.
Moreover, advanced users may choose to implement machine learning algorithms that analyze historical data to predict future needs or optimize growing conditions further. By leveraging this analytical capability, gardeners can make informed decisions that enhance plant health and yield while minimizing resource waste.
Troubleshooting and Maintaining Your Smart Plant Monitor
As with any technological system, troubleshooting is an inevitable part of maintaining a smart plant monitor. Common issues may arise from sensor malfunctions due to environmental factors or wiring errors during assembly. If a sensor fails to provide readings or returns erratic data, it’s essential first to check all connections and ensure that power is being supplied correctly.
Additionally, regular maintenance checks should be scheduled to clean sensors from dirt or debris that may affect their performance—especially for soil moisture sensors that come into direct contact with soil. It’s also wise to periodically review your code for any updates or optimizations that could improve performance or add new features based on user feedback. In cases where remote monitoring is implemented via Wi-Fi or Bluetooth, connectivity issues may arise due to network changes or interference from other devices.
Ensuring that firmware is up-to-date on both the Arduino board and any connected devices can help mitigate these problems. By staying proactive in troubleshooting and maintenance efforts, users can ensure their smart plant monitor remains an effective tool in their gardening arsenal for years to come.
If you are interested in building a smart plant monitor with Arduino and sensors, you may also want to check out this article on the best software for NDIS providers. This comprehensive guide offers valuable information on software options that can help streamline operations and improve efficiency for NDIS providers. Click com/best-software-for-ndis-providers-a-comprehensive-guide/’>here to learn more.
FAQs
What is a smart plant monitor?
A smart plant monitor is a device that uses sensors to monitor and track the environmental conditions of a plant, such as soil moisture, temperature, and light levels.
What is Arduino?
Arduino is an open-source electronics platform based on easy-to-use hardware and software. It is commonly used for building digital devices and interactive objects that can sense and control the physical world.
What sensors are commonly used in a smart plant monitor?
Common sensors used in a smart plant monitor include soil moisture sensors, temperature and humidity sensors, light sensors, and pH sensors.
How does a smart plant monitor work?
A smart plant monitor works by using sensors to measure the environmental conditions of a plant, and then relaying that data to a microcontroller, such as an Arduino. The microcontroller processes the data and can trigger actions, such as watering the plant when the soil moisture is low.
What are the benefits of using a smart plant monitor?
Using a smart plant monitor can help ensure that plants receive the optimal conditions for growth, leading to healthier and more productive plants. It can also help conserve water by only watering plants when necessary.
What are the basic components needed to build a smart plant monitor with Arduino and sensors?
The basic components needed to build a smart plant monitor with Arduino and sensors include an Arduino board, various sensors (such as soil moisture, temperature, and light sensors), connecting wires, a breadboard, and a power source.